Building a social media site - Infrastructure II.
In the previous post we had a look at the high-level overview of the infrastructure of our shiny new webapp. Now it’s time to take a deep-dive into the implementation details. I know you’re stoked to see some actual code, so here we go!
Dockerising the applications
To be able to deploy our apps to Kubernetes, we have to build Docker container images for the apps. If you remember, we’re dealing with an Angular4 SPA, and a dotnetcore backend.
You might wonder why I chose to serve static files from a container instead of using Google CDN for distribution. While the latter might seem to be the straightforward choice in most cases, I have several reasons why I you’d want to go with the other.
- Containers make versioning easy. I can tag them with the build numbers, and use that to deploy and roll back any changes without a fuss.
- Invalidating CDN cache is ssllloooww. It’s not a big deal, but if and when the house is on fire, it’s a pain to push out anything quickly.
- It’s a well-known practice to put a proxy in front of Kestrel, as it’s not necessarily ready to be exposed to the public.
These reasons lead me to settle with an Nginx container, which is responsible for serving static content, and proxy all traffic from /api to my backend.
Fortunately, configuring Nginx as a proxy is really easy.
server {
    listen 80;
    server_name localhost;
    location / {
        root /usr/share/nginx/html;
        index index.html;
        expires 1h;
        add_header Cache-Control "public";
    }

    location /api {
        proxy_pass http://localhost:8080;
    }
}
In this config you can see that Nginx is serving all static content (and index.html by default) from root, and forwards all calls from /api to my backend Api, running on port 8080. The localhost url is right in this case, as these 2 containers will sit in the same Pod, so they can communicate through the loopback interface.
Let’s wrap this with our SPA into a container. (if you’re not familiar with Dockerfiles, now is the right time to start ;))
FROM nginx
COPY nginx.conf /etc/nginx/conf.d/default.conf
COPY production /usr/share/nginx/html
What happens here is that we take the official Nginx image, copy the config and contents of the production folder - (Angular release artifacts). So far so good.
If you build this and spin it up, you’ll be able to navigate to http://localhost, and see the app running:
docker build -t myproject/blu-spa:latest .
docker run -d -p 80:80 myproject/blu-spa:latest
Now onto the backend. This one isn’t tricky either.
FROM microsoft/aspnetcore:2.0.0
WORKDIR /app
COPY ./publish .
ENV ASPNETCORE_URLS=http://+:8080
EXPOSE 8080
ENTRYPOINT ["dotnet", "Blu.Api.dll"]
You can run it the same way as the web container:
docker build -t myproject/blu-api:latest .
docker run -d -p 8080:8080 myproject/blu-api:latest
Now you can push them to your preferred container registry. I’m using Google Container Registry, which is nicely supported by the CLI tool. If you installed the Google SDK already, all you have to do is:
docker tag myproject/blu-api:latest eu.gcr.io/{GOOGLE_PROJECT_ID}/blu-api:latest
docker tag myproject/blu-spa:latest eu.gcr.io/{GOOGLE_PROJECT_ID}/blu-spa:latest
gcloud docker -- push eu.gcr.io/{GOOGLE_PROJECT_ID}/blu-api:latest
gcloud docker -- push eu.gcr.io/{GOOGLE_PROJECT_ID}/blu-spa:latest
Whew! This wasn’t too bad right?
Setting up a Kubernetes Cluster
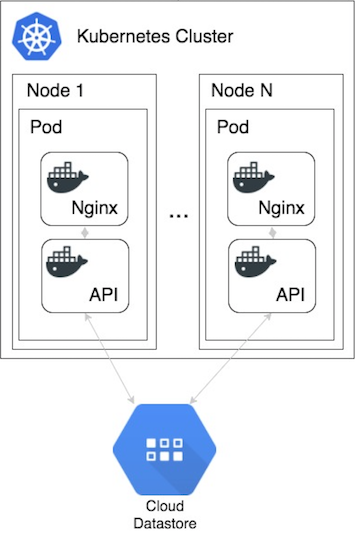
First, let’s take a closer look to our Kubernetes cluster. As a reminder, here how it looks like:

Before I go into details, there are a few Kubernetes terminology you’ll have to be familiar with in order to get what’s going on with this setup.
Each Node is a VM running in GCloud, running a single instance of a Pod - containing 2 docker containers with our NginX and Api images.
With one node in place this works just fine. But as soon as we want to scale up, we have to introduce a Service to gain a single point of entry to our infrastructure. The following quite summarises this concept perfectly:
Kubernetes Pods are mortal. They are born and when they die, they are not resurrected. A Kubernetes Service is an abstraction which defines a logical set of Pods and a policy by which to access them - sometimes called a micro-service. The set of Pods targeted by a Service is (usually) determined by a Label Selector (see below for why you might want a Service without a selector).
Fortunately you can configure everything in yaml files - so without saying more, check out the configurations.
Service:
apiVersion: v1
kind: Service
metadata:
  annotations:
    kompose.cmd: kompose convert
    kompose.version: 1.2.0 ()
  creationTimestamp: null
  labels:
    io.kompose.service: blu-service
  name: blu-service
spec:
  type: LoadBalancer
  ports:
  - port: 80
    targetPort: 80
  selector:
    io.kompose.service: blu-service
status:
  loadBalancer: {}
The most important thing about this config is the type: LoadBalancer part, because this tells the service to expose its ports to the public, and act as a loadbalancer in front of the deployment pods. You can read more about Service types here.
Deployment:
apiVersion: extensions/v1beta1
kind: Deployment
metadata:
  labels:
    io.kompose.service: blu-service
  name: blu-pod
spec:
  replicas: 1
  strategy: {}
  template:
    metadata:
      creationTimestamp: null
      labels:
        io.kompose.service: blu-service
    spec:
      containers:
      - image: eu.gcr.io/{GOOGLE_PROJECT_ID}/blu-api:latest
        name: blu-api
        resources: {}
      - image: eu.gcr.io/s{GOOGLE_PROJECT_ID}/blu-spa:latest
        name: blu-spa
        resources: {}
      restartPolicy: Always
status: {}
The deployment config specifies our 2 container images, with names. I’ve omitted some parts here, but you can use environment variables, port declarations and others things, just like in docker-compose.
The replicas config is set to 1, as I only have 1 node for now.
We can use Kubectl to create the deployment and service in our cluster from these yamls.
kubectl create -f blu-deployment.yaml
kubectl create -f blu-service.yaml
If you check your cluster now, you should be able to see your deployment up and running.
Coming up next…
Now that we successfully deployed our application containers to Kubernetes, in the next post we’ll automate the building and deployment process with CircleCI.